Distant Stitch Diploma, Module 4 - Course Summary


Distant Stitch Diploma, Module 4, Chapter 13 - Contemporary Textile Artists


206


207


208


Distant Stitch Diploma, Module 4 - Presentation Boards 2


Presentation Board 4


Presentation Board 5


Presentation Board 6


Distant Stitch Diploma, Module 4, Chapter 12 - Designs and Samples for Third Assessment Piece

For my third presentation piece, I am working on a 2-dimensional design. Within the design I hope to create a 3-dimensional effect by using colour and light to show perspective. My initial idea is to create a view from the seabed looking up towards the surface of the sea, looking through rock formations.

191

I have used the slip shapes as stencils to start the design, using a small stencil at the top centre of the drawing to denote distance, gradually changing to a large stencil to depict foreground.


192

I have added shading, lighter shading to show distance, darker colours to show foreground.


193
A variation on the first drawing.


194

Looking at possible colour ranges in gouache. 

Bottom row - I have mixed Naples Yellow with white on the far left, graduating through to Cerulean Blue with black in the centre.


195
A colour chart to take a closer look at shading.


196

Colour shading applied to the design. There are not enough shades here to clearly depict a third dimension.


197
I decided that the 'breaks' in the foreground were not very effective, so painted over them.


198
I applied a digital effect over the painting (Fresco), which has enhanced the design and has helped to develop the foreground.


199

Another digital effect (Glowing Edges). Here the background and foreground are not very distinguishable, but I love the drama that has been recreated.


200
Looking back to a design I created in Chapter 4, I have coloured Yupo paper with alcohol inks to create  the background (the surface of the sea, in the distance).


201

I cut out the shape from the centre of the design onto black felt and cut small pieces of polyester organza in various colours.


202
Using a soldering iron, I lightly marked them down onto the felt and cut round to reveal the shape.


203
I marked the organza down with firm marks to create a pattern on the organza and lightly glued the Yupo design underneath.


204
I have added strong pink stitches to represent light streaming through the water from the surface above. The other stitches are purely experimental at this stage, just to see how well the colours marry with the background.


205

In this sample, I have gone back to my original colours and have tried to blend the colours to create a gradual colour change from blue/black to pale yellow. The markings in the lower part are much bolder so that it appears that the lower part of the sample is the foreground and the paler top section, with lighter marks recedes to the distance. I also spaced the markings further apart in the lower section and closer together in the upper section to try and create the illusion of distance.


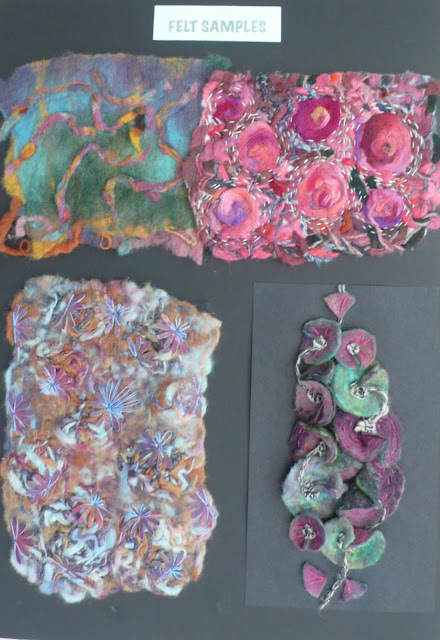
Distant Stitch Diploma Module 4, Chapter 11 - Resolved Sample to Develop a Design in Felt


I've worked on two samples of felt. The first piece using knitting, working on size 25 needles.

181


182


183
I used the embellisher to create circles by working round paper shapes. My initial attempt wasn't very effective so I cut out circles of knitting from a separate piece and embellished them in place.


184

Going back to my coral reef theme, I was influenced by my original photo in Chapter 8, page 90. I have painted pelmet vilene in sympathetic colours to add enhancements to the felt.


185

I cut out shapes using a soldering iron and added stitching to complement the shapes. However I decided that the gold thread was not a very good choice, so removed it. 


186


The finished resolved piece. The colours are all in harmony and the textured areas show up well against the stitching.


For the second sample, I went back to the circular shapes created in Chapter 9, page 151.

187

I created 2 pieces of felt to be embellished together. The first side is made from merino wool tops and painted lace.


188
The second side is made from Nuno felt, with hand stitching. I gently embellished the pieces together avoiding any 'bleeding' of colours.


189
I cut out circles and added tiny darts so that the felt would hold its shape. In Chapter 9 they reminded my of orchids, now they look more like foxgloves or holly hocks. Some pieces show the pink/purple stitched felt and others show the green/turquoise lace felt.


190
I embellished several strands of wool together and also felted some rosettes. to create a focal point in the 'flower'.  I threaded the wool through the shapes to complete the design.


Distant Stitch Diploma, Module 4, Chapter 10 - Felt Making

 I have done wet and dry felting over the years. I made myself a cobweb scarf. It was beautiful but I found that I couldn't wear it because it was very itchy next to my skin!


162

I used no. 25 knitting needles and two strands on multi-coloured wool, one uniform width and the other variegated widths. I then felted it with an embellisher.


163
Next I used pre-dyed merino tops to create circles.


164
Embellished knitting with merino tops circles and running stitch. The felt is quite thick but I love the combination of colours.


165
Close up.


166
In the next sample, I have used purple wet felted merino tops, yellow merino roving wool embellished with variegated knitting wool and blue dry felted merino tops. 


167
I used the embellisher to fuse the layers together. 


168

167 seen from the other side.


169
Cut strips.


170

Felt strips applied to the felt using an embellisher.


171
Close up.


172
Wet felted cobweb felt.


173
Painted lace laid over the felt.


174
Lace distressed using and embellisher.


175

Reverse of 174.


176

Variegated black and white wool.


177

Wool laid out and embellished to form a piece of felt.


178
Green foil attached to muslin using Fuse FX.


179
Triangles of muslin embellished to felt. The muslin was distressed and some of the foil was lost. Very little of the muslin appeared on the back of the felt.


180

Triangles enhanced with variegated thread, applied with an embellisher.