I have chosen a sample of furnishing fabric with a floral section and borders on each side to work with during this chapter. The fabric is quite thick with a printed rather than woven pattern. The warp and weft consists of 2 different thicknesses of thread. It frays easily on the grain of the fabric, but not on the bias.
 |
| Page 65 |
 |
| Page 66 |
In this strip of fabric I have picked out the small, fragmented background pattern and have represented it with snippets of cut fabric on a painted background.
 |
| Page 67 |
Here I have extended the colours freely, not keeping to any specific shapes but just letting the design flow down over the paper. (Gouache paint)
 |
| Page 68 |
Much more controlled this time, continuing the design literally onto the paper. (Gouache paint)
 |
| Page 69 |
This interpretation is more abstract, just hinting at the shapes behind the colours. I used Inktense block shavings to create this design. Very pleased with this result.
 |
| Page 70 |
I used some dyed and embroidered fabric left over from the C&G certificate for this turned edge. The edge consists of 4 layers, with thin strips to emphasise the triangular shapes.
 |
| Page 71 |
This turned edge incorporates rows of buttonholes, with rods inserted. There is a row of painted glue squiggles between the rows. The buttons are attached on threads suspended below the edge to provide a fringe.
 |
| Page 72 |
I used a soldering iron to cut out the pattern for this turned edge. It consists of 3 layers. The 2 under layers have been stitched and cut, then folded up over the front edge of the floral fabric to make a neat edge.
 |
| Page 73 |
This faced piece is in 3 layers. Each layer has an internal seam facing. The flower shapes were cut out with a soldering iron and then the 3 layers were stitched together and the shapes sewn in place. The faux silk fabric was coloured with Intense block shavings.
 |
| Page 74 |
I decided I would try to work out a design using my initials (NV).
 |
| Page 75 |
I have used 3 layers of fabric for this sample - pale blue plastic, blue/grey floral cotton and shiny grey polyester. The 2 top layers have slotted into each other. I couldn't get this to work for another layer, so the third layer is sewn on top and decorated with pale blue triangles. This was tricky but I was very pleased with the result.
 |
| Page 76 |
There are 2 main layers here with decorative designs cut into each layer with a soldering iron.
 |
| Page 77 |
Although 'slashing' is not strictly 'fraying' I think this is very effective. I chose the zigzag design, based on a pattern I had seen on a Tudor doublet. I stacked 5 layers of fabric to create this design.
 |
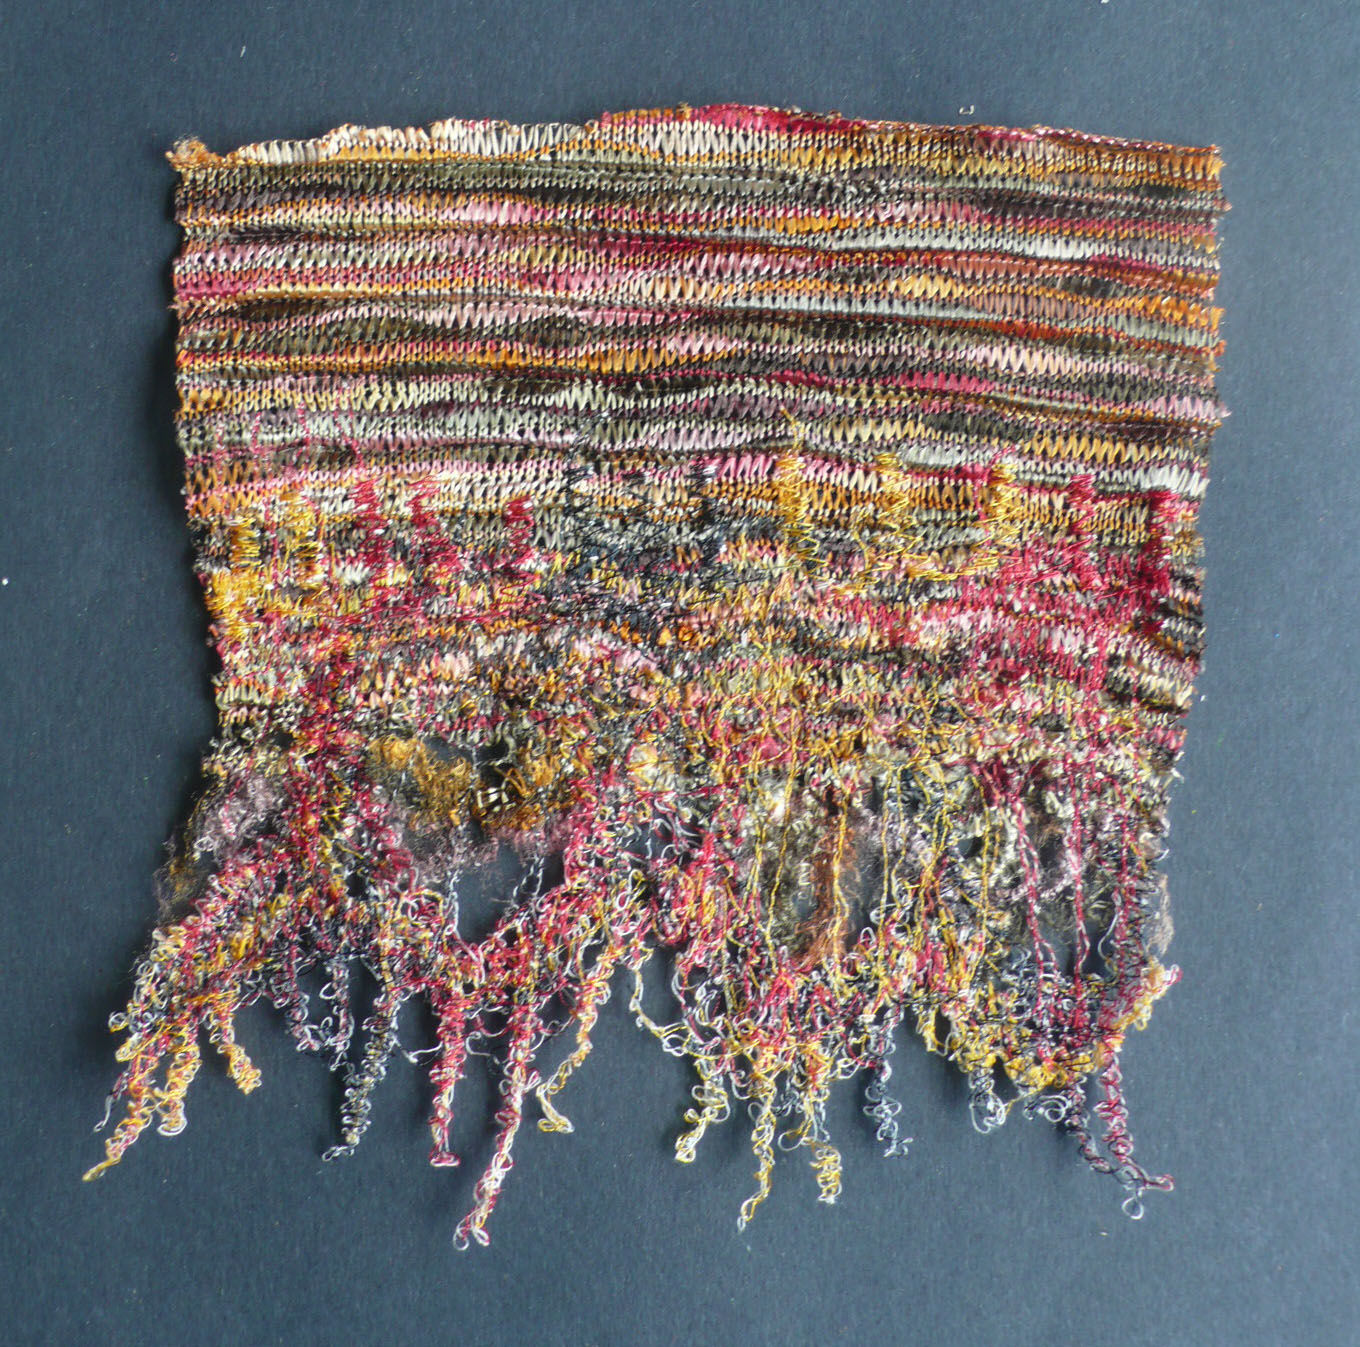
Page 78
Using the same zigzag theme I used a piece of knitted fabric. The fraying is wonderful. I'll take warning from this as I used this fabric to make myself a waistcoat. I'd better make sure I don't snag it on anything!
 | Page 79
Close up of the wonderful fraying!
|
|
 |
| Page 80 |
I have not ever 'flounced' before, so it was interesting to try some variations. These are the shapes I found the most pleasing.
 |
| Page 81 |
Stitched flounces. I love the way the folds hang. This has given me some ideas for my PAP2. I might use this technique to create a 'watery edge'.
 |
| Page 82 |
I have folded and gathered a layer of net, not very inspiring, so decided to move on.
 |
| Page 83 |
Back to my knitted fabric with the wonderful ability of fray! It is quite hard to see but I have free machine stitched into it using a variegated thread that matches the fabric. Everything blends together and the fraying is secured in place by the stitching as well as a slight residue from the soluble fabric.
 |
| Page 84 |
This is the front and back of the same fabric. The middle section is the front, shown vertically and the top and bottom pieces are the back of the fabric, turned horizontally. Using soluble fabric I stitched diagonally across the fabrics in a pattern to mimic the original design.
 |
| Page 85 |
Going back to my original piece of fabric I have decided to use fraying and flouncing as my choices for edging.
 |
| Page 86 |
This is the finished piece. It consists of 4 layers. I have used the side borders to create the decorative edges.
 |
| Page 87 |
The lowest layer is simple fraying. I removed the weft thread, which was a thick, white thread. You can see the faint, printed design on the warp threads.
 |
Page 88
The next flounced layer is made from 2 layers of organza with snippets of fabric (from design on page 66) between, them, held in place with bondaweb. The border is 'reverse' slashing. I laid a ribbon of the fabric (used on page 84) on top and zigzagged along both edges. I then slashed and frayed it to form a decorative edge.
|
 |
| Page 89 |
This layer is a simple flounce. I thought about fraying the edge but decided against it. I love the way the fabric hangs in simple folds.
 |
| Page 90 |
This is the main piece of fabric. I cut the lower edge of fabric to complement the flowing nature of the foliage. I have added reverse slashing and frayed the edges of the fabric. I forgot to photograph the layers before I stitched them together, hence the white paper to show the shape of the lower edge.
 |
| Page 91 |
This flower has been enhanced with a frayed ribbon of fabric around the edge and I have added layers of fraying inside to represent the petals. This helps to marry the flower to the lower layers.


