I started to sort out items from my stash to see if any had 'beady' qualities!
 |
| 58 |
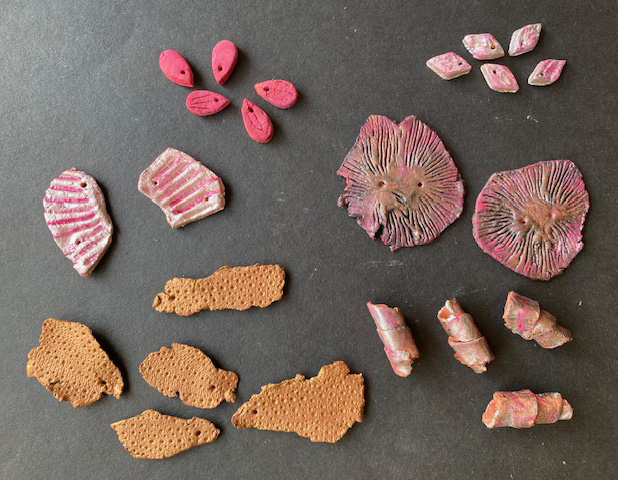
The first type of beads I have made are from clay. I used cutters and shell imprints to create the beads below. I used mushroom coral, cockle shells and sea urchin shell to make the patterns. I painted them lightly with pink and metallic paints. Each bead can be linked onto a thread.
 |
| 59 |
 |
| 60 |
I shrunk Christmas glitter strands, which formed an interesting mesh. They can be moulded whilst still warm and could be shaped into toggles.
 |
| 61 |
More plastic shrinking! This did not really appeal to me.
 |
| 62 |
This time I painted some plastic in blue and yellow diagonals and then applied heat to shrink it.
 |
| 63 |
Next I sandwiched threads between OHP sheets. The plastic only shrank a little but the edges became sealed.
 |
| 64 |
Pieces cut and threaded with ribbon.
 |
| 65 |
Another shrinking experiment - a couple of old popsocks over a glass tumbler. The nylon blistered rather than shrunk but the emerging layers were beautifully delicate.
 |
| 66 |
The nylon cut from the glass.
 |
| 67 |
A selection of toggles, made using bondaweb and tyvek as a base. The 2 on the bottom left are made from pop socks. I have decorated some with sequins, sequin waste, plastic coils and threads.
 |
| 68 |
The base of this toggle is an OHP sheet. I pierced holes using a soldering iron, then wrapped strands of FuseFX around it and sprinkled it with embossing powder and heated it with a heat gun. A lovely delicate effect.
 |
| 69 |
With re-use and re-cycle being part of this module, I have used some of my fish samples from PAP4 that probably won't make it into the finished piece. They are made from felt and polyester organza, wrapped round a kebab stick and heated to form a toggle.
 |
| 70 |
This is a longer strand of fish.
 |
| 71 |
The toggle is large but the emerging patterns, with the melted organza and unaffected stitching is very pleasing.
 |
| 72 |
The reverse side.
 |
| 73 |
Beading on a loom was quite a challenge. I decided to use section from the totem, designed in the last chapter. I worked out a grid but the beads I chose didn't quite match up to the grid pattern, as they were not all the same size.
 |
| 74 |
The black beads were tall he same size but I used a variety of sizes for the coloured beads, not realising how this would distort the design, not a major problem, but a lesson learnt.
 |
| 75 |
A close-up of a slightly wonky bead sample!
 |
| 76 |
I have to admit that I rather liked the unpredictability of the pattern, so I did another one, this time deliberating choosing different sized beads.
 |
| 77 |
Another re-cycling experiment, this time using buttons to make a bracelet, chunky but wearable!
 |
| 78 |
 |
| 79 |
Beads arranged on 78 and 79 for presentation purposes.
 |
| 80 |
The necklace was madee some time ago at a workshop, so I've added a matching ring, made from moulded clay, painted and wrapped with coloured beads.
 |
| 81 |
I made the background during chapter 3. I love the patterns that are created by rusty objects. The beads are made of painted tyvek, wrapped with metallic thread. I arranged the 'fans' inspired by my research photos in chapter 1.